- Aprire il registro di sistema usando REGEDIT.
- Premere il tasto Windows sulla tastiera
- Selezionare Esegui…
- scrivere regedit
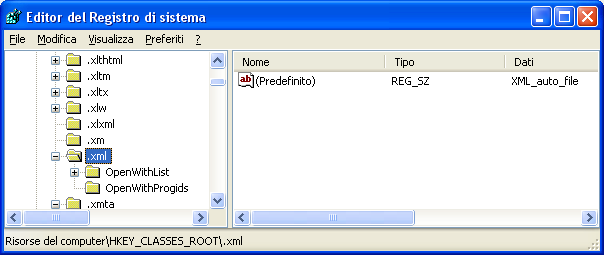
- Muoversi nell’albero fino ad individuare la chiave HKEY_CLASSES_ROOT\.xml
- Modificare, facendo doppio click sulla scritta, il valore stringa Predefinito(a destra): da xml_auto_file in xmlfile
- Aggiungere un nuovo valore stringa, facendo click col tasto destro nel pannello di destra e scegliendo Nuovo->Valore Stringa
- Assegnare (scrivendolo) il nome Content Type (quando terminato di scriverlo, premere il tasto Invio sulla tastiera)
- Fare un doppio click su questo nuovo valore stringa Content Type e scrivere text/xml
Senza categoria
Art. 26, distruzione prodotti
Forfettari, 2019 fattura
I forfettari 2019 (ricavi 65.000) sono esonerati ma hanno la facolta’ di ricevere la fattura od emettere la fattura in formato digitale.
- “Operazione effettuata da soggetto appartenente a regime fiscale di vantaggio ai sensi dell’art.1, commi da 54 a 89, L. n. 190/2014”
Per quei contribuenti che inoltre sono soggetti a ritenuta d’acconto, come nel caso dei professionisti o degli agenti rappresentanti, è necessario segnalare al committente la non applicazione di tale ritenuta all’atto del pagamento della fattura, in quanto la stessa risulterebbe incompatibile con l’applicazione dell’imposta sostitutiva dell’Irpef prevista dal regime in commento.
Dunque, la fattura del forfettario, oltre a contenere la dicitura suddetta, deve anche indicare che trattasi di:
Le fatture emesse
Un aspetto che sicuramente deve essere curato dal contribuente riguarda la specifica annotazione da riportare in fattura (dalla prima del 2019!) circa l’appartenenza al regime di vantaggio. Infatti, è adeguato indicare in calce alla fattura una dicitura del tipo:
Il provvedimento dell’Agenzia delle entrate indicato riguarda il regime degli ex minimi ma sicuramente è applicabile, quanto alla ritenuta d’acconto, anche ai forfettari.
- Operazione effettuata ai sensi dell’articolo 1, commi da 54 a 89, della Legge n. 190/2014 così come modificato dalla Legge numero 208/2015 e dalla Legge n. 145/2018
- “Prestazione non soggetta a ritenuta d’acconto secondo quanto previsto dal punto 5.2 del provvedimento Agenzia Entrate del 22.12.2011 n. 185820”.
- Dicitura fattura forfettario per cessioni intracomunitarie: il contribuente forfettario italiano che effettua prestazioni di servizi generiche ai sensi dell’art. 7-ter del D.P.R. n. 633/1972, nei confronti di soggetti passivi IVA con residenza in un altro Paese UE, non effettua un’operazione intracomunitaria bensì un’operazione interna senza diritto di rivalsa. In questo caso, la dicitura fattura sarà sempre: “Operazione effettuata ai sensi dell’art. 1, commi da 54 a 89 della Legge n. 190/2014 – Regime forfetario”. Inoltre, in caso di cessioni intra, il contribuente forfetario non deve presentare il modello Intrastat di beni o servizi.
- Dicitura fattura forfettari operazioni con l’estero: il contribuente forfetario in caso di cessioni all’esportazione, deve indicare nella fattura i riferimenti dell’’art. 8 del DPR n. 633/1972 e la dicitura “operazione non imponibile” ai sensi dell’art. 21, comma 6, lett. b) del DPR n. 633/1972.
Bollo su fattura regime forfettario 2019: Per i contribuenti nel nuovo regime forfettario è dovuto il bollo su fatture se di importo superiore ad euro 77,47.
L’imposta di bollo che va assolta acquistando un contrassegno telematico, ex marca da bollo, da 2 euro o attraverso il bollo virtuale su fattura elettronica, è obbligatoria in quanto dette operazioni non sono soggette ad IVA (CM n. 7/E del 2008), sono invece esenti da imposta di bollo, le fatture che riguardano gli acquisti intracomunitari e per quelle in cui il forfetario risulta debitore di IVA come ad esempio nel meccanismo di inversione contabile.
L’utilizzo del canale telematico per la trasmissione e/o ricezione delle fatture
Infine, come anticipato, i contribuenti aderenti al regime forfettario possono decidere di continuare a utilizzare i tradizionali sistemi di gestione e conservazione delle fatture attive e passive (cartaceo). Detti contribuenti, infatti, fatta eccezione per le fatture emesse alla Pubblica amministrazione, sono liberi di decidere se digitalizzare il processo di fatturazione o meno.
Una riflessione però è opportuna. Infatti, qualora il contribuente forfettario decida di utilizzare le modalità telematiche, indicando ad esempio il codice destinatario o la Pec per la ricezione delle fatture dai propri fornitori, o qualora comunichi sul portale fatture e corrispettivi uno dei detti indirizzi, sarà poi obbligato a conservare digitalmente i documenti fiscali al pari di un normale soggetto Iva.

Adeguamento dei registratori di cassa
Altro aspetto che necessita di dovuti aggiustamenti riguarda quei contribuenti che certificano i ricavi attraverso l’uso del registratore di cassa. In tali circostanze, infatti, il documento fiscale non può che essere lo scontrino il quale, come sappiamo, indica esclusivamente il corrispettivo pagato (o non pagato) ma nulla in relazione all’aliquota Iva applicata. Quest’ultima sarà poi indicata nella chiusura giornaliera. Orbene, visto che il regime forfettario non prevede l’applicazione dell’Iva, il registratore di cassa deve essere adeguato al nuovo regime di vantaggio. Per fare ciò sarà necessario contattare il tecnico abilitato e chiedere allo stesso di adeguare il registratore di cassa alle mutate esigenze fiscali.
woocommerce query
select
p.ID as order_id,
p.post_date,
max( CASE WHEN pm.meta_key = ‘_billing_email’ and p.ID = pm.post_id THEN pm.meta_value END ) as billing_email,
max( CASE WHEN pm.meta_key = ‘_billing_phone’ and p.ID = pm.post_id THEN pm.meta_value END ) as billing_phone,
max( CASE WHEN pm.meta_key = ‘_billing_first_name’ and p.ID = pm.post_id THEN pm.meta_value END ) as _billing_first_name,
max( CASE WHEN pm.meta_key = ‘_billing_last_name’ and p.ID = pm.post_id THEN pm.meta_value END ) as _billing_last_name,
max( CASE WHEN pm.meta_key = ‘_order_total’ and p.ID = pm.post_id THEN pm.meta_value END ) as order_total,
max( CASE WHEN pm.meta_key = ‘_order_tax’ and p.ID = pm.post_id THEN pm.meta_value END ) as order_tax,
max( CASE WHEN pm.meta_key = ‘_paid_date’ and p.ID = pm.post_id THEN pm.meta_value END ) as paid_date,
max( CASE WHEN pm.meta_key = ‘_billing_field_597’ and p.ID = pm.post_id THEN pm.meta_value END ) as partita_iva,
max( CASE WHEN pm.meta_key = ‘_billing_field_757’ and p.ID = pm.post_id THEN pm.meta_value END ) as codiceUnivoco,
max( CASE WHEN pm.meta_key = ‘_billing_field_846’ and p.ID = pm.post_id THEN pm.meta_value END ) as codice_fiscale,
max( CASE WHEN p.ID = wptr.object_id THEN wptr.term_taxonomy_id END ) as status
from
fum_posts as p,
fum_postmeta as pm,
fum_term_relationships as wptr
where
post_type = ‘shop_order’ and
p.ID = pm.post_id
group by
p.ID
query woocommerce 1.0
SELECT
— Order Meta
p.ID AS order_id,
p.post_status AS order_status,
p.post_date AS order_date,
max( CASE WHEN pm.meta_key = ‘_order_total’ AND p.ID = pm.post_id THEN pm.meta_value END ) AS order_total,
max( CASE WHEN pm.meta_key = ‘_order_tax’ AND p.ID = pm.post_id THEN pm.meta_value END ) AS order_tax,
— Payment
max( CASE WHEN pm.meta_key = ‘_paid_date’ AND p.ID = pm.post_id THEN pm.meta_value END ) AS paid_date,
max( CASE WHEN pm.meta_key = ‘_payment_method’ AND p.ID = pm.post_id THEN pm.meta_value END ) AS payment_method,
max( CASE WHEN pm.meta_key = ‘_transaction_id’ AND p.ID = pm.post_id THEN pm.meta_value END ) AS transaction_id,
— Order Items
(
SELECT group_concat( order_item_name SEPARATOR ‘\n’ )
FROM fum_woocommerce_order_items oi
WHERE order_id = p.ID
AND oi.order_item_type = ‘line_item’
) AS line_items,
(
SELECT group_concat( CASE WHEN oim.meta_key = ‘_qty’ AND oi.order_item_id = oim.order_item_id THEN oim.meta_value END SEPARATOR ‘\n’ )
FROM fum_woocommerce_order_items oi
LEFT JOIN fum_woocommerce_order_itemmeta oim ON oi.order_item_id = oim.order_item_id
WHERE order_id = p.ID
AND oi.order_item_type = ‘line_item’
) AS line_items_qtys,
(
SELECT group_concat(
format(
CASE WHEN oim.meta_key = ‘_line_subtotal’ AND oi.order_item_id = oim.order_item_id THEN oim.meta_value END
, 2 )
SEPARATOR ‘\n’ )
FROM fum_woocommerce_order_items oi
LEFT JOIN fum_woocommerce_order_itemmeta oim ON oi.order_item_id = oim.order_item_id
WHERE order_id = p.ID
AND oi.order_item_type = ‘line_item’
) AS line_items_subtotals,
(
SELECT group_concat(
format(
CASE WHEN oim.meta_key = ‘cost’ AND oi.order_item_id = oim.order_item_id THEN oim.meta_value END
, 2 )
SEPARATOR ‘\n’ )
FROM fum_woocommerce_order_items oi
LEFT JOIN fum_woocommerce_order_itemmeta oim ON oi.order_item_id = oim.order_item_id
WHERE order_id = p.ID
AND oi.order_item_type = ‘shipping’
) AS shipping_cost,
— Contact Info
max( CASE WHEN pm.meta_key = ‘_billing_email’ AND p.ID = pm.post_id THEN pm.meta_value END ) AS billing_email,
max( CASE WHEN pm.meta_key = ‘_billing_phone’ AND p.ID = pm.post_id THEN pm.meta_value END ) AS billing_phone,
— Customer Data Example
— max( CASE WHEN pm.meta_key = ‘_customer_user’ AND p.ID = pm.post_id THEN pm.meta_value END ) AS user_id,
— max( CASE WHEN um.meta_key = ‘nickname’ THEN um.meta_value END ) AS user_nickname,
— Billing
max( CASE WHEN pm.meta_key = ‘_billing_first_name’ AND p.ID = pm.post_id THEN pm.meta_value END ) AS billing_first_name,
max( CASE WHEN pm.meta_key = ‘_billing_last_name’ AND p.ID = pm.post_id THEN pm.meta_value END ) AS billing_last_name,
max( CASE WHEN pm.meta_key = ‘_billing_address_1’ AND p.ID = pm.post_id THEN pm.meta_value END ) AS billing_address_1,
max( CASE WHEN pm.meta_key = ‘_billing_address_2’ AND p.ID = pm.post_id THEN pm.meta_value END ) AS billing_address_2,
max( CASE WHEN pm.meta_key = ‘_billing_city’ AND p.ID = pm.post_id THEN pm.meta_value END ) AS billing_city,
max( CASE WHEN pm.meta_key = ‘_billing_state’ AND p.ID = pm.post_id THEN pm.meta_value END ) AS billing_state,
max( CASE WHEN pm.meta_key = ‘_billing_postcode’ AND p.ID = pm.post_id THEN pm.meta_value END ) AS billing_postcode,
— Shipping
max( CASE WHEN pm.meta_key = ‘_shipping_first_name’ AND p.ID = pm.post_id THEN pm.meta_value END ) AS shipping_first_name,
max( CASE WHEN pm.meta_key = ‘_shipping_last_name’ AND p.ID = pm.post_id THEN pm.meta_value END ) AS shipping_last_name,
max( CASE WHEN pm.meta_key = ‘_shipping_address_1’ AND p.ID = pm.post_id THEN pm.meta_value END ) AS shipping_address_1,
max( CASE WHEN pm.meta_key = ‘_shipping_address_2’ AND p.ID = pm.post_id THEN pm.meta_value END ) AS shipping_address_2,
max( CASE WHEN pm.meta_key = ‘_shipping_city’ AND p.ID = pm.post_id THEN pm.meta_value END ) AS shipping_city,
max( CASE WHEN pm.meta_key = ‘_shipping_state’ AND p.ID = pm.post_id THEN pm.meta_value END ) AS shipping_state,
max( CASE WHEN pm.meta_key = ‘_shipping_postcode’ AND p.ID = pm.post_id THEN pm.meta_value END ) AS shipping_postcode
FROM fum_posts p
LEFT JOIN fum_postmeta pm ON p.ID = pm.post_id
LEFT JOIN fum_woocommerce_order_items oi ON p.ID = oi.order_id
— Customer Data Example
— LEFT JOIN fum_users u ON u.ID = pm.meta_value AND pm.meta_key = ‘_customer_user’
— LEFT JOIN fum_usermeta um ON um.user_id = u.ID
WHERE post_type = ‘shop_order’
GROUP BY p.ID;
Touch point
Domande alle quali rispondere per avviare una iniziativa online preceduta dalla ricerca dei touch point
1. Qual è il valore che questo touchpoint ti fornisce come cliente?
2. Questo touchpoint è all’altezza delle tue aspettative sul brand?
3. Come potresti ottimizzare questo touchpoint per offrire ai clienti un’esperienza migliore?
Fattura elettronica, istruzioni di base per forfetari e minimi
Fattura elettronica, istruzioni di base per forfetari e minimi
15/11/2018
- I contribuenti in regime di vantaggio (minimi e forfetari), pur essendo esonerati dall’obbligo di emissione delle fatture in formato elettronico, sono tuttavia tenuti alla conservazione in formato elettronico delle fatture ricevute. Così come dovrebbe avvenire per il condomino e gli enti non commerciali, dovrebbe essere possibile scaricare copia dei documenti mediante l’accesso a un’apposita area del sito dell’Agenzia delle Entrate. Sarà inoltre facoltà dei “minimi” (e forfetari) fornire al soggetto che emette la fattura di cui risulteranno destinatari un indirizzo Pec, cui il SDI recapiterà i documenti nel formato previsto.
- Tra gli obblighi rientra la conservazione delle fatture di acquisto e delle bollette doganali e secondo l’Amministrazione Finanziaria, siccome l’art. 39 D.P.R. 633/1972 dispone che le fatture elettroniche siano “conservate in modalità elettronica”, la conseguenza diretta si riscontrerebbe nell’obbligo supplementare di procedere alla conservazione elettronica dei documenti d’acquisto ricevuti che, quindi, non potrebbero essere gestiti in formato cartaceo, a differenza di quelli di vendita.
- La stessa posizione è stata assunta dall’Agenzia delle Entrate per l’invio delle fatture al condomino e agli enti non commerciali (privi di partita IVA), affermando che la copia cartacea (rilasciata ai sensi delle previsioni di legge contenute nel D.Lgs. 127/2015) a consumatori finali ed equiparati conserva il valore di duplicato del documento fiscale valido.
Acquisto cellulari
Iva 50% se uso promiscuo
Imposte 80%
Imprese
Ai sensi dell’art. 102 co. 9 del TUIR, le spese relative ai telefoni cellulari sono deducibili dal reddito d’impresa in misura pari all’80%.
La norma fa riferimento ai costi relativi ad “apparecchiature terminali per servizi di comunicazione elettronica ad uso pubblico di cui alla lettera gg) del comma 1 dell’art. 1 del codice delle comunicazioni elettroniche” di cui al DLgs. 259/2003. Secondo il citato art. 1 co. 1 lett. gg), costituiscono servizi di comunicazione elettronica ad uso pubblico “i servizi, forniti di norma a pagamento, consistenti esclusivamente o prevalentemente nella trasmissione di segnali su reti di comunicazione elettronica, inclusi i servizi di telecomunicazioni”. Dal tenore della disposizione, che ricomprende nel proprio ambito indistintamente i servizi di comunicazione e, dunque, anche i servizi afferenti le diverse tipologie di linee di collegamento telefonico, discende che i suddetti limiti fiscali operano sia per la telefonia fissa che quella mobile utilizzata nell’ambito dell’attività d’impresa o professionale o artistica (ris. Agenzia delle Entrate 17.5.2007 n. 104).
La circ. ABI 30.9.91 n. 69 ha evidenziato che la disposizione riguarda i c.d. “telefoni cellulari”.
Con riferimento ai costi, la citata norma riguarda ad esempio:
- le quote di ammortamento;
- i canoni di locazione, anche finanziaria, o di noleggio;
- le spese di impiego;
- le spese di manutenzione;
- l’IVA indetraibile.
La suddetta disposizione rappresenta una norma di sistema e non può essere disapplicata (cfr. ris. Agenzia delle Entrate 22.5.2008 n. 214 e 24.7.2008 n. 320).
In presenza di linee telefoniche non suscettibili di essere utilizzate per finalità diverse da quelle esclusivamente imprenditoriali, non si applica l’art. 102 co. 9 del TUIR (ris. 320/E/2008). Pertanto, laddove manchi il presupposto per l’utilizzo promiscuo del bene, il relativo costo sostenuto non è soggetto alla deducibilità limitata all’80%. L’insussistenza anche potenziale dell’utilizzo promiscuo deve essere verificata anno per anno e provata dal contribuente (cfr. norma di comportamento ADC n. 175/2009).
Con riferimento alle spese sostenute per conto del mandante (ris. Agenzia delle Entrate 21.7.2008 n. 309 e 18.6.2009 n. 162):
- le spese di telefonia sostenute dal mandatario senza rappresentanza in nome proprio e per conto del mandante e a quest’ultimo riaddebitate non subiscono il limite di deducibilità dell’80%;
- il limite dell’80% trova, invece, applicazione in capo al mandante, essendo il soggetto che resta inciso dal costo “provvisoriamente” sostenuto dal mandatario.
Quanto poi alle spese di telefonia, non suscettibili di uso promiscuo, costituenti costi di commessa, le stesse non sottostanno alla limitazione dell’80% di cui all’art. 102 co. 9 del TUIR, in quanto costituiscono l’oggetto dell’attività d’impresa e sono direttamente afferenti a ricavi o altri proventi che concorrono a formare il reddito (ris. n. 162/E/2009).
Imprese di autotrasporto
Sono interamente deducibili (100%) le spese relative agli impianti di telefonia dei veicoli di trasporto merci utilizzati da imprese di autotrasporto, limitatamente ad un solo impianto per ciascun veicolo (art. 102 co. 9 del TUIR).
Utilizzo da parte dei dipendenti
Qualora il telefono cellulare sia utilizzato esclusivamente a fini aziendali (ad esempio, con possibilità di effettuare chiamate esclusivamente verso numeri lavorativi), lo stesso non viene tassato in capo al dipendente, posto che l’utilizzatore non trae alcun beneficio personale dall’utilizzo. In tal caso, infatti, l’assegnazione del telefono non costituisce fringe benefit (parere ABI 18.12.2014 n. 1325).
Con riferimento alla concessione in uso promiscuo del cellulare aziendale, tale concessione rappresenta per il dipendente un fringe benefit ai sensi dell’art. 51 co. 3 del TUIR, tassato sulla base del valore normale determinato in base all’art. 9 del TUIR.
Secondo il parere ABI 18.12.2014 n. 1325, il criterio di valutazione da utilizzare, tanto ai fini della determinazione del benefit in capo al dipendente, tanto dell’importo da addebitare al dipendente stesso a titolo di consumi privati, è quello della tariffazione specifica per l’addebito dei costi relativi a questi ultimi. In mancanza di tale criterio di imputazione dei costi e della relativa fatturazione sarebbe difficile stabilire a priori una percentuale forfettaria di quantificazione dei costi extra aziendali, considerando anche che il legislatore quando ha inteso prevedere l’applicazione di percentuali forfetarie lo ha espressamente previsto.
In sostanza, per la determinazione del valore normale delle telefonate private effettuate con il telefono cellulare aziendale, è possibile fare riferimento alle tariffe applicate dal gestore telefonico; tale valore coincide con il costo delle telefonate per uso personale risultante dalla bolletta (Galletti G. “Il regime impositivo dei telefoni cellulari assegnati ai dipendenti”, Rassegna Tributaria, 5, 2005, p. 1696 ss).
Resta fermo che l’importo tassabile deve essere considerato al netto di quanto eventualmente corrisposto dal dipendente per i beni e servizi di cui ha fruito (cfr. C.M. 326/97, § 2.3.1).
In caso di telefono cellulare appartenente al dipendente, il rimborso del 50% dei costi sostenuti dal dipendente per l’utilizzo promiscuo del proprio telefono cellulare costituisce reddito di lavoro dipendente ex art. 51 co. 1 del TUIR. In particolare, la parte di costo relativo al servizio di telefonia e al traffico dati che la società rimborsa ai lavoratori dipendenti sulla base di un criterio forfetario (es. 50% delle spese sostenute) non è supportato da elementi e parametri oggettivi e, dunque, in assenza di una specifica previsione di legge, non può essere escluso dalla determinazione del reddito di lavoro dipendente (ris. Agenzia delle Entrate 20.6.2017 n. 74).
Non sono invece assoggettate a tassazione le somme erogate per rimborsare il costo dei collegamenti telefonici sostenuti dai dipendenti che svolgono lavoro a domicilio, trattandosi di rimborso di spese di interesse esclusivo del datore di lavoro anticipate dal dipendente (ris. Agenzia delle Entrate 7.12.2007 n. 357).
Professionisti
Ai sensi dell’art. 54 co. 3-bis del TUIR sono deducibili nella misura dell’80% le spese relative ad apparecchiature terminali per servizi di comunicazione elettronica ad uso pubblico.
Tale disposizione riguarda, ad esempio:
- le quote di ammortamento;
- i canoni di locazione, anche finanziaria, o di noleggio;
- le spese di impiego;
- le spese di manutenzione;
- l’IVA indetraibile.
Tale deducibilità limitata opera anche in relazione ai costi dei servizi telefonici, incluse le spese sostenute per l’acquisto delle ricariche telefoniche (circ. Agenzia delle Entrate 18.6.2008 n. 47, § 3.4). Ai fini del riconoscimento della deducibilità dal reddito di lavoro autonomo, i predetti costi devono essere connotati dei requisiti dell’inerenza all’attività professionale o artistica svolta e della tracciabilità della spesa, che deve essere stata effettivamente sostenuta dal contribuente e con riferimento alla quale siano note le modalità di pagamento utilizzate.
Tabella riepilogativa
La seguente tabella riepiloga la deducibilità delle spese relative ai telefoni cellulari.
| Soggetti | % deducibilità |
| Imprese | 80% |
| Imprese di autotrasporto | 100% |
| Professionisti | 80% |
Super-ammortamenti
L’acquisto di telefoni cellulari può beneficiare dei super-ammortamenti.

Si consideri l’acquisto di un cellulare al costo di 400 euro (IVA indetraibile inclusa). Ordinariamente, considerata la percentuale di deducibilità dell’80%, il costo deducibile nell’esercizio di acquisizione sarebbe pari a 320 euro (400 × 80%); il costo indeducibile sarebbe, quindi, pari a 80 euro. Per effetto del super-ammortamento, il costo d’acquisto maggiorato del 40% è pari a 560 euro, con conseguente costo deducibile totale pari a 448 euro (560 × 80%). In tal caso, in dichiarazione occorre indicare (tra le variazioni in aumento) la quota di costo fiscalmente indeducibile (20%), non considerando il super-ammortamento, pari a 80 euro, e (tra le variazioni in diminuzione) la maggior quota deducibile per effetto del super-ammortamento, pari a 128 euro.
(Versione aggiornata al 10.10.2018)
Telefoni cellulari
Irap
Imprese che calcolano l’IRAP in base al bilancio
Di regola, tali soggetti assumono i componenti rilevanti ai fini della determinazione della base imponibile nella misura stanziata nel Conto economico, se non sussistono deroghe espresse nella normativa IRAP. Pertanto, i costi relativi ai telefoni cellulari dovrebbero essere integralmente deducibili (e non nel limite dell’80% come generalmente avviene in ambito IRES).
Infatti, il principio di inerenza applicabile ai fini IRAP è quello civilistico, desumibile dalla corretta applicazione dei principi contabili (circ. Agenzia Entrate 16.7.2009 n. 36, § 1.2, e 22.7.2009 n. 39).
Naturalmente, il contribuente ha l’onere di provare l’inerenza del costo, intesa quale riferibilità dello stesso all’attività d’impresa (questione che dovrebbe risultare di fatto automatica in presenza di beni correlati all’attività svolta e acquisiti in funzione della produzione di ricavi).
Tuttavia, ciò dovrebbe avvenire solo a seguito di una specifica contestazione; e l’onere di contestare l’inerenza di un determinato costo rimarrebbe sempre e comunque a carico dell’Amministrazione, la quale, con i dovuti riscontri, dovrebbe:
- o dimostrare che il bene non è stato affatto utilizzato nell’attività d’impresa (ad esempio, che il telefono cellulare è stato usato esclusivamente per fini personali);
- o dimostrare che il quantum dei costi dedotti non era congruo (ad esempio, che i costi di quel determinato telefono cellulare dedotti integralmente erano invece deducibili per il 75%, o per il 65%, e così via, dando le opportune spiegazioni del fatto).
In tale prospettiva, il contribuente non può essere obbligato a “ricostruire” i costi inerenti con procedure che hanno costi amministrativi eccessivi.
Imprese che non calcolano l’IRAP in base al bilancio
Per le società di persone commerciali e gli imprenditori individuali che, per obbligo o per scelta, determinano la base imponibile IRAP ai sensi dell’art. 5-bis del DLgs. 446/97, i costi relativi ai telefoni cellulari sono deducibili secondo le stesse regole applicabili ai fini della determinazione del reddito d’impresa.
Rimangono comunque non imponibili o indeducibili i proventi o gli oneri che non rientrano tra quelli rilevanti ai sensi del citato art. 5-bis: è il caso, ad esempio, delle plusvalenze o delle minusvalenze.
Esercenti arti e professioni
In capo agli esercenti arti e professioni, si applica la medesima disciplina prevista ai fini della determinazione del reddito di lavoro autonomo ai fini IRPEF (art. 8 del DLgs. 446/97).
(Versione aggiornata al 17.8.2018)
Telefoni cellulari
IVA e indirette
La cessione di telefoni cellulari ai fini IVA è effettuata mediante il meccanismo del reverse charge.
A norma dell’art. 17 co. 6 lett. b) del DPR 633/72 sono, infatti, soggette a reverse charge le cessioni di “apparecchiature terminali per il servizio pubblico radiomobile terrestre di comunicazioni soggette alla tassa sulle concessioni governative”.
La disposizione è entrata in vigore a seguito del rilascio della necessaria misura di deroga alla direttiva 2006/112/CE da parte del Consiglio dell’Unione europea (decisione 22.11.2010 n. 710) e trova efficacia fino al 31.12.2018 secondo quanto previsto dall’art. 17 co. 8 del DPR 633/72 in conformità con l’art. 199-bis della citata direttiva.
Ambito applicativo del reverse charge
L’applicazione dell’IVA mediante reverse charge per i telefoni cellulari è limitata alle sole cessioni effettuate nella fase distributiva che precede il commercio al dettaglio, vale a dire alle cessioni nei confronti di cessionari che siano “utilizzatori finali” del bene (ancorché soggetti passivi d’imposta); circ. 59/E/2010; § 2.
Secondo quanto indicato con ris. 36/E/2011, devono quindi ritenersi escluse da reverse charge:
- le cessioni effettuate dai soggetti che esercitano attività di commercio al minuto e attività assimilate di cui all’art. 22 del DPR 633/72, eseguite in “locali aperti al pubblico, in spacci interni, mediante apparecchi di distribuzione, per corrispondenza, a domicilio o in forma ambulante”, i cui cessionari sono, di regola, utilizzatori finali dei beni, ancorché soggetti passivi;
- le cessioni effettuate da soggetti diversi da quelli di cui all’art. 22 del DPR 633/72, purché eseguano le operazioni direttamente nei confronti di cessionari-consumatori finali.
A decorrere dal 3.3.2016 non rientrano più nell’ambito applicativo del reverse charge le cessioni di componenti ed accessori dei telefoni cellulari.
Devono intendersi ricomprese nella disciplina del reverse charge, invece, le cessioni di smartphone in quanto classificabili nella voce di Nomenclatura combinata 8517.12 (“Telefoni per reti cellulari e per altre reti senza filo”). Secondo quanto indicato nelle Note esplicative alla Nomenclatura, infatti, sono ricompresi anche i “telefoni mobili” dotati della possibilità di svolgere altre funzioni (oltre alla telefonia), tra cui: invio e ricezione di SMS, MMS, posta elettronica; commutazione di pacchetti per l’accesso a internet; invio e ricezione di segnali di posizione; navigazione, programmazione di un percorso, cartografia, messaggeria istantanea, telefonia vocale su internet (voIP); computer palmare; giochi; ricezione di segnali radio o televisivi; ripresa, registrazione e riproduzione di suoni e immagini.
Detrazione IVA
La previsione di indetraibilità dell’IVA nella misura del 50%, prevista dall’art. 19-bis1 lett. g) del DPR 633/72 è stata abrogata dalla L. 244/2007 (legge finanziaria 2008), con effetto dall’1.1.2008.
Ai fini della detrazione, rimane necessario il rispetto del vincolo di “inerenza” di cui all’art. 19 co. 1 del DPR 633/72, essendo ammessa in detrazione la sola imposta relativa ai beni acquistati nell’esercizio di impresa, arte o professione. Per i beni utilizzati in parte nell’ambito di impresa e in parte per fini privati, la quota di imposta (in)detraibile dovrà essere determinata secondo “criteri oggettivi, coerenti con la natura dei beni (…) acquistati” ai sensi dell’art. 19 co. 4 del DPR 633/72.
I medesimi criteri riguardano le spese di telefonia mobile, per le quali non sono previsti limiti “oggettivi” alla detrazione, salvo il rispetto del principio di inerenza dei servizi acquistati.
In caso di acquisto e utilizzo del telefono cellulare tanto nell’ambito dell’attività di impresa, arte o professione quanto nell’ambito privato, il soggetto passivo è, dunque, tenuto ad individuare secondo criteri oggettivi la quota di IVA detraibile sulla base dell’effettivo utilizzo del telefono, risultando ammessa in detrazione la sola quota di imposta afferente l’impiego del bene per effettuare operazioni ricomprese nel campo di applicazione del tributo.
Ai fini di controllo, resta comunque necessario indicare nel rigo VA5 del Modello IVA 2018 l’ammontare imponibile e l’IVA assolta sull’acquisto di telefoni cellulari e sui relativi servizi di gestione, nell’ipotesi in cui l’imposta sia stata detratta in misura superiore al 50%.
Tassa di concessione governativa
L’art. 21 della Tariffa allegata al DPR 641/72 prevede l’applicazione della tassa sulle concessioni governative (TCG) sulla “Licenza o documento sostitutivo per l’impiego di apparecchiature terminali per il servizio radiomobili pubblico terrestre di comunicazione (art. 318 del DPR 29.3.73 n. 156 e art. 3 del DL 13.5.91 n. 151, conv. L. 12.7.91 n. 202) per ogni mese di utenza”. A livello giurisprudenziale sono dibattuti due aspetti:
- la legittimità della TCG sui contratti di abbonamento al servizio di telefonia mobile (cellulari), alla luce del mutato contesto normativo;
- l’applicabilità della TCG nei confronti delle Pubbliche Amministrazioni diverse dalle amministrazioni statali.
Riguardo alla prima questione, l’art. 318 del DPR 156/73 è stato abrogato dall’art. 218 co. 1 lett. s) del DLgs. 259/2003. I contribuenti che sostengono l’illegittimità del tributo evidenziano che l’art. 160 del DLgs. 59/2003, nel non considerare più necessarie le autorizzazioni amministrative precedentemente previste, avrebbe abrogato la TCG in materia. Secondo l’Amministrazione finanziaria, invece, la tassa sulle concessioni governative è dovuta quando viene rilasciato all’utente un documento attestante la sua condizione di abbonato, in quanto il contratto di abbonamento rappresenta il titolo giuridico che consente all’utente di utilizzare il sistema di telefonia mobile (in tal senso, la ris. Agenzia delle Entrate 18.1.2012 n. 9). Riguardo al secondo aspetto, la tesi dei Comuni (ma anche di altre Pubbliche Amministrazioni diverse da quelle statali) sulla non applicabilità della TCG nei loro confronti, si fonda su un’analogia tra tale tipologia di soggetti e le Amministrazioni dello Stato, espressamente esentate dall’applicazione del tributo, ex art. 13-bis co. 1 del DLgs. 641/72.
Decisione delle Sezioni Unite e orientamenti giurisprudenziali
Con la sentenza 2.5.2014 n. 9560 delle Sezioni Unite della Corte di Cassazione è stato deciso che:
- la TCG sui contratti di abbonamento al servizio di telefonia mobile è perfettamente coerente alle direttive comunitarie sulla libertà di comunicazione, né può ritenersi abrogata dal DLgs. 259/2003, stante la sostanziale identità tra stazioni radioelettriche ed apparecchiature terminali (telefoni cellulari);
- l’esenzione della TCG sui contratti di abbonamento ai servizi di telefonia mobile, espressamente prevista per le amministrazioni statali, non può essere estesa agli enti locali, poiché, sulla base dei principi generali, le norme che prevedono agevolazioni fiscali sono di stretta interpretazione, per cui non sono suscettibili di estensione analogica.
Tra le altre, si sono adeguate alla decisione delle Sezioni Unite: C.T. Reg. Milano 10.7.2014 n. 3834/42/14 e Cass. 10.9.2014 n. 19138. Precedentemente alla decisione delle Sezioni Unite si segnalano:
- tra gli orientamenti a favore della persistenza del presupposto impositivo la Cass. 14.12.2012 n. 23052, la C.T. Prov. Reggio Emilia 19.7.2010 n. 133/01/10, la C.T. Prov. Vicenza 5.2.2010 n. 15/09/10 e la C.T. Prov. Vicenza 18.5.2010 n. 55/05/10;
- tra gli orientamenti che sostengono la non sussistenza del presupposto impositivo la C.T. Prov. Macerata 17.5.2012 n. 76/2/12, la C.T. Prov. Treviso 17.12.2012 n. 98/4/12 e la C.T. Prov. Treviso 27.9.2010 n. 113/5/10.
In relazione all’applicabilità della TCG nei confronti degli enti locali, invece, si segnala la C.T. Prov. di Vicenza, sentenze 10.11.2008 n. 68/10 e 30.11.2009 n. 102, e la C.T. Reg. Veneto, sentenza 10.1.2011 n. 5/1/11. In aggiunta, la C.T. Prov. Treviso 27.9.2010 n. 113/05/10 ha riconosciuto ai Comuni il diritto al rimborso delle somme versate negli anni passati a titolo di tassa sulle concessioni governative. Il principio secondo cui le Amministrazioni dello Stato e gli enti pubblici ad esse equiparati ai fini fiscali non sono assoggettabili alla tassa sulle concessioni governative per mancanza del presupposto soggettivo di applicazione dell’imposta è contenuto, inoltre, nella ris. Agenzia delle Entrate 12.2.2008 n. 44, ma era già stato precisato dalla ris. Agenzia delle Entrate 3.5.2005 n. 55, dalla ris. Agenzia delle Entrate 4.8.2004 n. 109, dalla ris. Agenzia delle Entrate 15.5.2003 n. 107 e dalla ris. Agenzia delle Entrate 11.10.2000 n. 154.
Alimenti e bevande (trattamento fiscale IVA ed Imposte)
Ai sensi dell’art. 19-bis1 co. 1 lett. f) del DPR 633/72, non è ammessa in detrazione l’imposta assolta per l’acquisto di alimenti e bevande, tranne che per i beni:
- oggetto dell’attività propria dell’impresa;
- destinati alle prestazioni di somministrazione in mense scolastiche, mense aziendali o interaziendali o mediante distributori automatici collocati nei locali dell’impresa.
Secondo l’art. 19-bis1 co. 1 lett. h) del DPR 633/72, non è ammessa in detrazione l’IVA relativa alle spese di rappresentanza (come definite ai fini delle imposte sui redditi), ad eccezione dell’imposta assolta sull’acquisto di beni omaggio di costo unitario non superiore a 50 euro.
Non è più previsto, invece, il regime di indetraibilità “oggettiva” dell’IVA afferente le prestazioni di somministrazione di alimenti e bevande di cui al previgente art. 19-bis1 co. 1 lett. e) del DPR 633/72 (modificato dall’art. 83 co. 28-bis del DL 112/2008).
L’imposta relativa alle prestazioni di ristorazione è, dunque, integralmente detraibile, secondo le regole ordinarie, ossia “nella misura in cui i servizi stessi risultino inerenti ad operazioni che consentono l’esercizio del diritto alla detrazione e siano documentati con fattura” (circ. Agenzia delle Entrate 19.5.2010 n. 25).
Quanto alle spese di ristorazione, per la detraibilità integrale dell’imposta, è dunque necessaria:
- l’inerenza della prestazione all’esercizio dell’attività di impresa, arte o professione del fruitore del servizio, ai sensi dell’art. 19 co. 1 del DPR 633/72;
- la richiesta della fattura.
Aliquota applicabile
Alla somministrazione di alimenti e bevande si applica l’aliquota IVA del 10%, a norma del n. 121 della Tabella A, parte III, allegata al DPR 633/72.
Considerato che la somministrazione di alimenti e bevande ai fini IVA è qualificata come “prestazione di servizi” ex art. 3 co. 2 n. 4 del DPR 633/72, deve ritenersi esclusa l’aliquota agevolata del 10% per la cessione di piatti “da asporto” (cfr. R.M. 20.9.98 n. 107), ivi applicandosi l’aliquota prevista per i singoli prodotti che compongono il piatto. Detta esclusione riguarda anche i servizi di “food delivery”, intesi come la consegna a domicilio di piatti già preparati, il cui acquisto è avvenuto via internet (cfr. interpello DRE Lombardia n. 904-46/2016).
L’aliquota del 10% si applica, altresì, alle somministrazioni di alimenti e bevande effettuate mediante l’utilizzo di distributori automatici, indipendentemente dal luogo in cui è ubicato il distributore.
Si applica, invece, l’aliquota IVA del 4% alla somministrazione di alimenti e bevande presso mense aziendali e interaziendali, secondo il disposto del n. 37 della Tabella A, parte II, allegata al DPR 633/72, se rese a titolo oneroso, anche qualora siano eseguite sulla base di contratti di appalto o di apposite convenzioni.
Se rese a titolo gratuito, invece, le somministrazioni di pasti nelle mense aziendali esulano dal campo di applicazione dell’IVA ex art. 3 co. 3 del DPR 633/72.
Connessione RDP
Ci sono 2 programmi: a) remmina b) rdesktop
Per remmina per installarlo usare
sudo apt-get install remmina remmina-plugin-rdp remmina-plugin-vnc
per farlo partire da console remmina <nome_server_rdp>
per rdesktop
uso il seguente comando
rdesktop -f -PKD 192.168.30.95